
Autoclaving Surgical Instruments: Temperature, Time and Care Guide
Jul
Every reusable surgical instrument lives or dies by how it is sterilized. Done right, a high quality medical grade stainless steel instrument survives thousands of autoclave cycles. Done wrong, even premium instruments stain, rust, stiffen and fail within months. This guide covers the correct autoclave temperatures and times, how to prepare instruments before sterilization, and the mistakes that quietly destroy instrument trays, based on CDC steam sterilization guidance and our own experience manufacturing surgical instruments at Adas Instruments.
What Is Autoclaving?
An autoclave sterilizes instruments with pressurized saturated steam. Pressure lets steam reach temperatures above normal boiling point, killing bacteria, viruses and resistant spores. It is the standard method for all solid stainless steel instruments: forceps, scissors, needle holders, retractors, cannulas, osteotomes and speculums.
Correct Autoclave Temperature and Time for Surgical Instruments
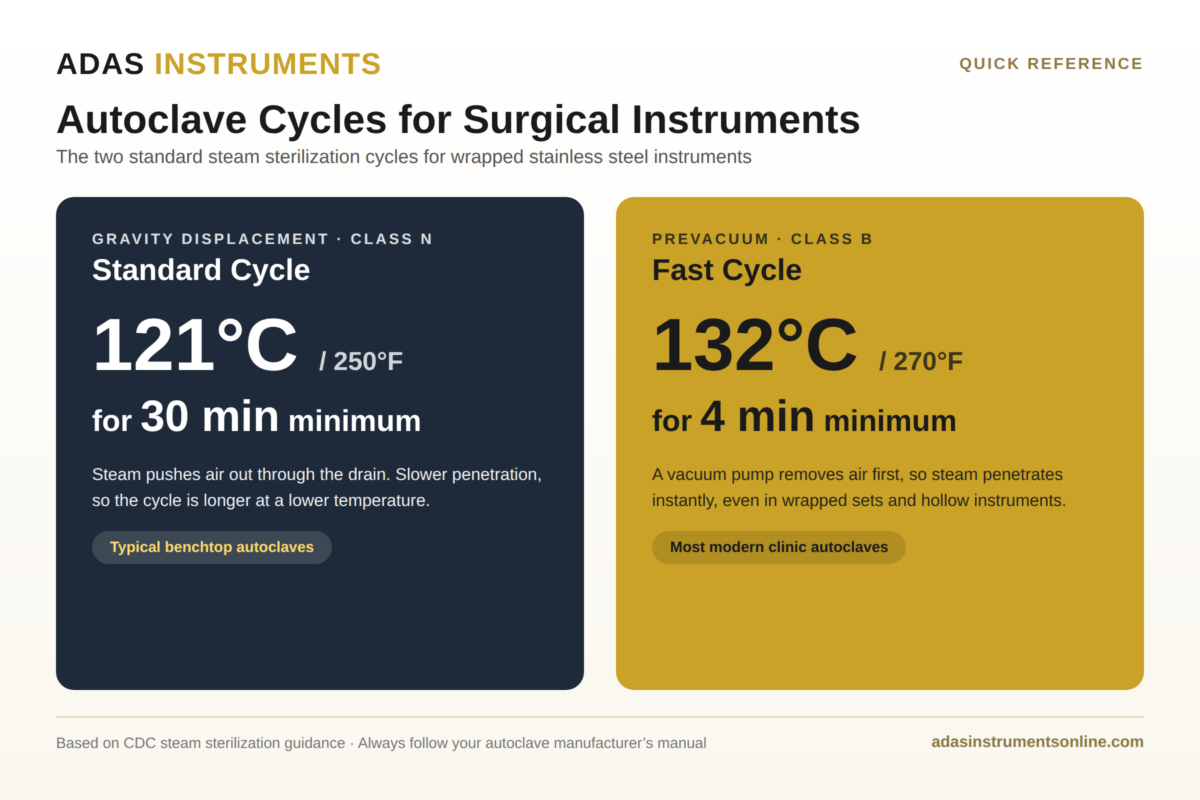
The two standard cycles, per CDC guidance, are:
- 121°C (250°F) for a minimum of 30 minutes for wrapped instruments in a gravity displacement autoclave
- 132°C (270°F) for a minimum of 4 minutes for wrapped instruments in a prevacuum autoclave
Prevacuum sterilizers pull the air out before steam enters, so steam penetrates instantly and cycles run much faster. Gravity displacement units push air out with incoming steam and need the longer, cooler cycle. If you are unsure which type you own: most modern clinic autoclaves are prevacuum (Class B), while many benchtop units are gravity (Class N).
Always follow your autoclave manufacturer’s manual and local regulations; the numbers above are the internationally recognized baselines.
Before the Autoclave: Cleaning Comes First
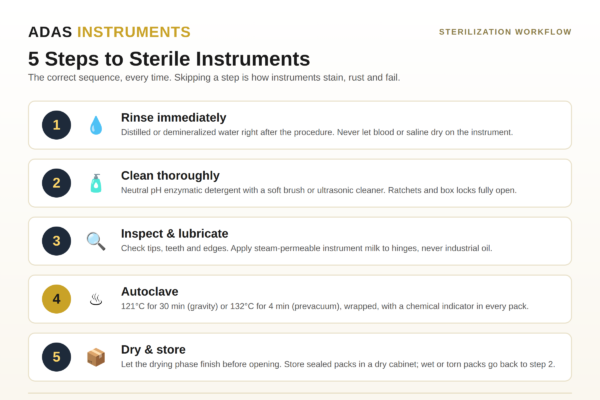
Sterilization does not clean. Blood, tissue and saline left on an instrument get baked on by steam heat and start corrosion under the residue. The correct sequence:
- Rinse instruments in distilled or demineralized water immediately after the procedure. Never let blood dry on them.
- Clean with a neutral pH (7 to 8.5) enzymatic detergent, manually with a soft brush or in an ultrasonic cleaner. Never use household bleach or abrasive pads.
- Open all ratchets and box locks fully so steam reaches every surface.
- Lubricate hinged instruments with a steam-permeable instrument milk before sterilizing, never industrial oil.
- Inspect tips, teeth and edges. Damaged instruments should be repaired or retired, not sterilized and reused.
What Can and Cannot Be Autoclaved
All solid high quality medical grade stainless steel instruments from Adas are fully autoclavable, including hemostats and forceps, scissors, tungsten carbide (TC) instruments, liposuction cannulas and their aluminium hubs. Points that need care:
- Tungsten carbide instruments: autoclave normally, but avoid detergents containing benzyl ammonium chloride, which attacks TC inserts.
- Fiber optic instruments: the metal body autoclaves; follow the stated cycle limits so repeated heat does not degrade light transmission.
- Laryngoscope handles: remove batteries and bulbs first. The handle itself autoclaves safely.
- Titanium and coated instruments: autoclavable; the coating also resists staining.
Why Instruments Rust or Stain, and How to Prevent It
Stainless steel is stain-resistant, not stain-proof. Nearly all spotting and rust comes from four preventable causes: tap water minerals (use distilled water only, including in the autoclave reservoir), saline exposure (rinse it off immediately, saline pits steel faster than blood), mixed metals in one tray (a single chrome-plated instrument can deposit rust on every neighbour), and baked-on residue from skipping cleaning. Brown or rainbow staining can often be removed with commercial stain remover; true pitting is permanent.
Drying and Storage
Let the drying phase finish before opening the autoclave; wet packs wick bacteria from the air and moisture promotes staining. Store wrapped, sterilized sets in a dry, dust-free cabinet, and re-sterilize any pack whose wrap is torn or wet. With correct care, a quality instrument should give 10 or more years of service.
Ultrasonic Cleaning: The Step Most Clinics Skip
An ultrasonic cleaner removes debris that brushing cannot reach: inside box locks, serrations, ratchets and cannula lumens. High-frequency sound waves create microscopic bubbles (cavitation) that scrub every surface, including places no brush can touch. Run instruments 5 to 10 minutes in an enzymatic solution mixed to the manufacturer’s dilution, with ratchets open and similar metals grouped together, then rinse thoroughly in distilled water before autoclaving. Remember: an ultrasonic cleaner cleans, it does not sterilize. It is the preparation step, and the autoclave is the sterilization step.
Autoclave vs Dry Heat vs Cold Sterilization
Steam is not the only method, but it is the right one for almost everything we manufacture. Here is how the three compare:
- Steam autoclave: the standard for stainless steel instruments. Fast, reliable, penetrates wrapped sets, and safe for tungsten carbide. Its only real enemies are poor cleaning and tap water minerals.
- Dry heat (160 to 180°C for 1 to 2 hours): useful for items steam can corrode and traditionally favoured for very fine cutting edges, since there is no moisture. The trade-off is long cycles and high heat that packaging must tolerate.
- Cold (chemical) sterilization: soaking in agents like glutaraldehyde or OPA. Reserve it for heat-sensitive items only; true sporicidal soaks take many hours, and residues must be rinsed with sterile water. For solid steel instruments it is slower and less reliable than steam.
Rule of thumb: if it is high quality medical grade stainless steel from Adas, autoclave it. Use the alternatives only when a component genuinely cannot take steam.
Pouches, Wraps and Trays: Keeping Instruments Sterile After the Cycle
Sterility ends the moment packaging is compromised, so the packaging matters as much as the cycle. Use self-seal sterilization pouches for single instruments, placed paper side up so steam penetrates and the instrument is visible through the film. Wrap full sets in two layers of sterilization wrap or use rigid containers with filters. Put a chemical indicator strip inside every pack, not just the external tape. Modern practice is event-related sterility: a pack stays sterile until it is opened, torn or gets wet, not until a fixed date, but always label packs with the sterilization date and load number so any failed spore test can be traced.
Testing Your Autoclave: Indicators and Spore Tests
A cycle that runs is not proof of a cycle that sterilizes. Three layers of testing keep you safe. Chemical indicators (the colour-change strips and tape) go on and in every pack and confirm exposure to steam. A Bowie-Dick test runs daily before the first load in prevacuum autoclaves, at 134°C for 3.5 minutes, to prove air removal. Biological spore tests, using Geobacillus stearothermophilus ampoules, are the gold standard and should run at least weekly, with results logged. If a spore test fails, quarantine everything processed since the last pass and re-sterilize after the fault is fixed.
Frequently Asked Questions
What temperature should an autoclave be for surgical instruments?
121°C (250°F) for at least 30 minutes in a gravity autoclave, or 132°C (270°F) for at least 4 minutes in a prevacuum autoclave, for wrapped instruments, per CDC guidance.
How long do you autoclave surgical instruments?
30 minutes at 121°C or 4 minutes at 132°C for wrapped sets, plus the drying phase. Unwrapped flash cycles are shorter but should be reserved for urgent single instruments, not routine processing.
Can you autoclave scissors and tungsten carbide instruments?
Yes. Quality stainless and TC instruments are designed for steam sterilization. Just avoid detergents with benzyl ammonium chloride on TC, and keep blades slightly open during the cycle.
Why do my surgical instruments have brown or black spots after autoclaving?
Usually mineral deposits from tap water, baked-on residue, or rust transferred from a damaged instrument in the same tray. Switch to distilled water, clean before sterilizing, and remove any rusted instrument from circulation immediately.
Do you sterilize instruments before shipping?
Instruments ship clean and passivated but not sterile. Always clean and autoclave any new instrument before its first use, as with every manufacturer.
Does an ultrasonic cleaner sterilize instruments?
No. Ultrasonic cleaning removes debris from joints and serrations that brushing misses, but it does not kill spores. Always autoclave after ultrasonic cleaning; the two steps are partners, not alternatives.
What is the difference between autoclave and dry heat sterilization?
An autoclave uses pressurized steam (121 to 134°C, minutes), while dry heat uses hot air (160 to 180°C, one to two hours). Steam is faster and standard for stainless instruments; dry heat suits moisture-sensitive items and preserves ultra-fine edges.
How often should you spore test an autoclave?
At least weekly is the widely accepted standard, and after any repair or relocation. Keep a written log; many regulators and insurers ask for it.
How long does a sterilized pouch stay sterile?
Under event-related sterility practice, until the pouch is opened, punctured or wet. Store packs dry and dust-free, label them with the date, and re-sterilize any pack whose packaging is compromised.
Browse our full range of autoclavable high quality medical grade stainless steel instruments in the Adas Instruments shop, or contact us for wholesale and OEM inquiries.
